B06Tang
Cafe Racer
Here is the not-so-awaited clutch cover install video with some help from Johnny B Goode:
http://www.youtube.com/watch?v=VBnp0sOUZ5w
http://www.youtube.com/watch?v=VBnp0sOUZ5w


Here is the not-so-awaited clutch cover install video with some help from Johnny B Goode:
http://www.youtube.com/watch?v=VBnp0sOUZ5w
Another great video, Matt. Question, Either I missed it or you didn't have to worry yourself much on the crank case breather hose. Is that not an issue on the later year bikes like it was on the earlier models?
The crank case breather hose, according to Triumph's manual, ran up to engine number 221607. Engine numbers 221608 and above does not have it as they re-routed it to the back side. The Haynes manual does not make mention of this and is why I like to have both manuals. To me, it seems the Triumph manual has just a little more information but I like how the Haynes manual is written and it is easy to follow for me.

Ah yes, the tube that comes out from the back of the cylinder head. That's right; now that you mention it.
I always thought the Triumph manual was a great resource, but I think it's produced with an unwritten understanding that you've already got a comprehensive idea of what's going on and it's more of a high level resource to refer back to, where the Haynes manual is a manual for beginners. At least that's how I view it.
Go for it. I'm happy to help, that's one of the great things with this site - all the information sharing that goes on.Hey Kiwi...this is freaking awesome! Do you mind if I steal these photos from you and incorporate them into a follow up video I am doing about this issue. Thanks for sharing this!:cheers:
Hey thanks for doing these videos. I've just watched the valve check and cam cover problem ones. Once you've replaced your shims and put the video up I'll go and check mine too.
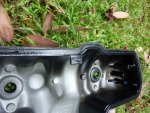
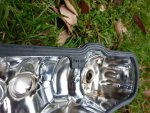
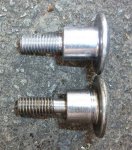
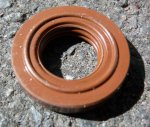
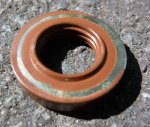
I've attached some pics that may answer your questions about the changes Triumph made to the cam cover weeping issue. I took these when I swapped my black cover for a chrome one. The old parts are off a 2009 bike and the new parts were bought at the end of 2011.
Pic 1 is the old gasket
Pic 2 is the new gasket - note 3 ridges instead of 2
Pic 3 The old bolt is at the bottom and the new bolt at the top - note the longer shoulder to put more pressure on the cover when tightening it up.
Pic 4 & 5 Both side of the new washers that came with the kit. I didn't take any pics of the old ones for some reason.
Again, thanks for the vids, keep it up, and I hope the pics are of some help.
No, all I've got off the bike are the old ones. The new ones that came with the new cam cover are currently on the bike doing their job. I can only assume that I didn't photograph the old and new ones together because there was no change and they were both the same. I took the photo's at the time to show a mate, who has a carbed Thruxton, what the changes were. I remember I also measured the differences in the bolts and let him know, but this was around 16 months ago now and I don't have that info lying about anymore.Do you have a set of the washers in your shop? I am curious of the thickness of them and wondering if you could throw a measurement on them for me. The old washers are at 4.3mm.
Here is the newest video on the starter drive. A good example how things can escalate if one thing is overlooked such as a simple thing like a wavy washer!
http://www.youtube.com/watch?v=kSoWMJbxPWw
Here is the newest video on the starter drive. A good example how things can escalate if one thing is overlooked such as a simple thing like a wavy washer!
http://www.youtube.com/watch?v=kSoWMJbxPWw