Hedge
American Infidel
**** Note - Author Unknown
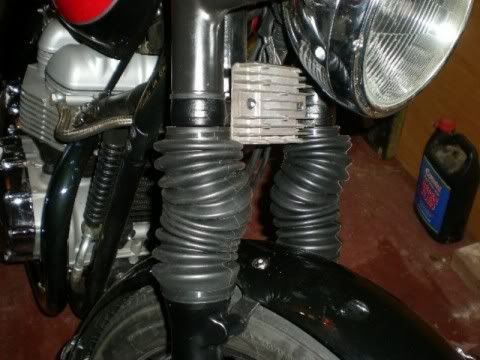
There's been lots of talk here lately about installing gaiters, no doubt because it's one of the more common do-it-yourself modifications. There also seems to be a great deal of anxiety about the procedure, possible because unlike adding knee pads or changing seats, it actually involves 'taking the bike apart'. Having recently installed a set of Euro Gaiters I thought perhaps some might benefit from what I learned during the process.
As others here have mentioned, I too was a bit concerned when I saw two pages of instructions! Relax... it's much easier than it first appears. They're not long because they're complicated, but because they're thorough. I suggest you sit down and read through the instructions several times until you understand exactly what you'll be doing. Read through the steps while looking at your bike too... it will help. Install the gaiters in your head and then when you do it on the bike it won't be the first time")
Next. make sure you have all the tools you'll need on hand before starting. I already had metric Allen wrench and socket sets. However, I now needed a 3/8 drive torque wrench (an inexpensive one will do fine), a 24mm socket, and a 6mm and 8mm hex drive to fit the torque wrench. The instructions provide the torque specs.
You'll need to raise the front wheel off the ground. I have a centre stand, and so to lift the front wheel I used a piece of 1 x 4 and the scissor jack from my Mazda placed under the engine. Raise it just enough to put the back wheel on the ground. Raise it too much and the centre stand legs will start to lift, with a topple not far behind! If you have a cycle lift you're all set.
Note that the gaiters have a small hole at the top which allows air in and out as they compress and extend. Before you install them check that this is open and clear. Mine were not, and as a result when the forks compressed the air squeezed out, and then when they extended the gaiters crumpled, as no air could get it. I had to remove the nylon ties and run a small drill through the holes to open them up!
Removing the plastic stone guards is easy. Ignore the instruction sheet suggestion that the fork be run under hot water! I had a piece of 2 x 2 about 12" long, and using it like a chisel on the bottom edge of the guards, tapped it gently with a hammer a few times and they slid right up off the lower forks. If you don't have a helper to hold the fork, knock the guards off while the forks are still on the bike.
Soaking the gaiters in very hot water to soften them helps greatly, as does the use of a pair of needle-nose pliers. After sliding the gaiter down to the lower tube, carefully grab the lip with the pliers and pull it over the tube into the groove where the stone guard formerly sat, Hold it with your thumb and grab it about an inch farther around. Just repeat until the bottom of the gaiter is fully seated. It's actually simpler than it sounds.
Once the bike is reassembled make sure that the gaiters are not twisted or else they will kink, especially when compressed. The easiest way is to check that the fine molding seam is straight.
At first I used the supplied black nylon zip-locks. After I cut them off (to clear out the vent hole!) I decided to use something different. I couldn't justify $40 for the special 1960s repro gaiter clamps, but at the local Home Depot I got some stainless steel hose clamps for about $1 each (two different sizes - I think they were 2 1/2" and 3"). Cut the tongue shorter and grind or file it smooth. Make sure you don't tighten the top clamp to the extent that it squeezes the vent hole closed.
In all, the whole procedure took a bit over an hour, without help.
This is easy.
(1)Loosen front wheel
(2)Remove and support caliper
(3)Get front wheel off the ground. Be sure the bike is secure,
(4) Remove front wheel
(5) Remove the struts and fender. This may take some wiggling. Watch the paint. I put masking tape on the painted surface to protect.
(6)Do one side at a time with the fork legs. Remove the bolts from the triple trees. There is long and a short one, remember where the came out of.
(7)Twist the leg out
(8)Install gaiters
(9)Reinstall leg...WD40 on the fork tube makes sliding this in easy. Do not put the bolts back in
(10) Repeat on other side.
(11) Install axle without wheel. It doesn't have to be tighten.
(12) Install triple tree bolts. Use antisieze on the threads..
(13) Remove axle
(14) Reinstall fender, wheel axle and caliper.
(15) Go for a test ride
(16) Have a beer for a job well done..
There's been lots of talk here lately about installing gaiters, no doubt because it's one of the more common do-it-yourself modifications. There also seems to be a great deal of anxiety about the procedure, possible because unlike adding knee pads or changing seats, it actually involves 'taking the bike apart'. Having recently installed a set of Euro Gaiters I thought perhaps some might benefit from what I learned during the process.
As others here have mentioned, I too was a bit concerned when I saw two pages of instructions! Relax... it's much easier than it first appears. They're not long because they're complicated, but because they're thorough. I suggest you sit down and read through the instructions several times until you understand exactly what you'll be doing. Read through the steps while looking at your bike too... it will help. Install the gaiters in your head and then when you do it on the bike it won't be the first time
Next. make sure you have all the tools you'll need on hand before starting. I already had metric Allen wrench and socket sets. However, I now needed a 3/8 drive torque wrench (an inexpensive one will do fine), a 24mm socket, and a 6mm and 8mm hex drive to fit the torque wrench. The instructions provide the torque specs.
You'll need to raise the front wheel off the ground. I have a centre stand, and so to lift the front wheel I used a piece of 1 x 4 and the scissor jack from my Mazda placed under the engine. Raise it just enough to put the back wheel on the ground. Raise it too much and the centre stand legs will start to lift, with a topple not far behind! If you have a cycle lift you're all set.
Note that the gaiters have a small hole at the top which allows air in and out as they compress and extend. Before you install them check that this is open and clear. Mine were not, and as a result when the forks compressed the air squeezed out, and then when they extended the gaiters crumpled, as no air could get it. I had to remove the nylon ties and run a small drill through the holes to open them up!
Removing the plastic stone guards is easy. Ignore the instruction sheet suggestion that the fork be run under hot water! I had a piece of 2 x 2 about 12" long, and using it like a chisel on the bottom edge of the guards, tapped it gently with a hammer a few times and they slid right up off the lower forks. If you don't have a helper to hold the fork, knock the guards off while the forks are still on the bike.
Soaking the gaiters in very hot water to soften them helps greatly, as does the use of a pair of needle-nose pliers. After sliding the gaiter down to the lower tube, carefully grab the lip with the pliers and pull it over the tube into the groove where the stone guard formerly sat, Hold it with your thumb and grab it about an inch farther around. Just repeat until the bottom of the gaiter is fully seated. It's actually simpler than it sounds.
Once the bike is reassembled make sure that the gaiters are not twisted or else they will kink, especially when compressed. The easiest way is to check that the fine molding seam is straight.
At first I used the supplied black nylon zip-locks. After I cut them off (to clear out the vent hole!) I decided to use something different. I couldn't justify $40 for the special 1960s repro gaiter clamps, but at the local Home Depot I got some stainless steel hose clamps for about $1 each (two different sizes - I think they were 2 1/2" and 3"). Cut the tongue shorter and grind or file it smooth. Make sure you don't tighten the top clamp to the extent that it squeezes the vent hole closed.
In all, the whole procedure took a bit over an hour, without help.
This is easy.
(1)Loosen front wheel
(2)Remove and support caliper
(3)Get front wheel off the ground. Be sure the bike is secure,
(4) Remove front wheel
(5) Remove the struts and fender. This may take some wiggling. Watch the paint. I put masking tape on the painted surface to protect.
(6)Do one side at a time with the fork legs. Remove the bolts from the triple trees. There is long and a short one, remember where the came out of.
(7)Twist the leg out
(8)Install gaiters
(9)Reinstall leg...WD40 on the fork tube makes sliding this in easy. Do not put the bolts back in
(10) Repeat on other side.
(11) Install axle without wheel. It doesn't have to be tighten.
(12) Install triple tree bolts. Use antisieze on the threads..
(13) Remove axle
(14) Reinstall fender, wheel axle and caliper.
(15) Go for a test ride
(16) Have a beer for a job well done..