


Bonafide
NBR founder
Original author is Keef
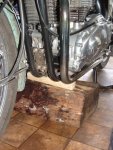
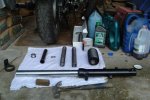
First thing you need to do is put your bike on its centre stand and lift the front end of the bike to place a good solid 7” to 8” high by 10" wide block under it so that the front wheel is lifted up off the ground. With this arrangement, it is also possible to remove both wheels together if required.
see image 1
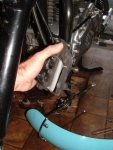
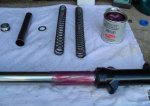
Remove the front wheel, speedo drive, brake calipers and mud guard – it is not necessary to disconnect the brake hose. Fit a 3 or 4mm spacer between the brake pads to prevent unnecessary hassle should the brake lever get inadvertently pulled and tie it up out of the way – somewhere near the oil cooler should be fine.
see images 2 & 3
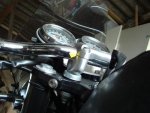
Remove the handlebars if it looks like you might need to push the stanchions downwards from above (it might be helpful to mark their position to save time later) and loosen the 8mm Allen clamp screws on the top and bottom yokes on one side only – best to work on one fork at a time, otherwise refitting them into the yokes might be tricky. This done, slide the fork downwards and out of the yokes being careful not to disturb the tube on which the headlamp is mounted.
see images 4 & 5
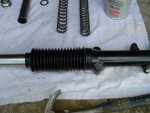
With the fork free, the stock stanchion protector plate can now be removed by carefully tapping it upwards with a hammer and a small piece of hardwood by degrees around its circumference. It’s worth giving the fork stanchion and slider a good clean at this point before applying a rubber compatible grease to the area of stanchion over which the gaiter is to be placed. Simply slide the new gaiter over and down the stanchion, fitting the wider end over the part of the fork slider previously occupied by the protector plate, pushing the end as far down towards the mudguard mounts as it will go (you might need to secure the gaiter with a tie or a jubilee clip, but I think this is best done after both forks are back in position in the yokes).
see images 6 & 7
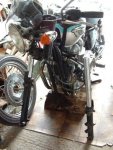
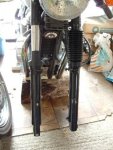
The fork can then be fitted back up into the yokes simply by reversing the removal process so that the top of the stanchion (not the top cap) is level with the top face of the upper yoke. Tighten the lower clamp bolt first, then the upper one. see image 8
Repeat the above with the other fork.
You can now refit the front wheel (it might be worth pumping the forks a few times to let them settle before tightening the spindle bolt), speedo drive, mudguard, brake caliper and handlebars.
Screw and bolt torque data (Bonnie/T100):
Yoke clamp Allen bolts at 27Nm
Handlebar clamp bolts at 26Nm
Front mudguard to fork slider bolts at 12Nm
Front mudguard stays to fork slider bolts (10mm) at 9Nm
Front wheel spindle nut at 60Nm
Front wheel spindle clamp Allen bolt (at base of RH fork slider) at 27Nm
Front brake caliper mounting Allen bolts (on LH fork slider) at 28Nm
First thing you need to do is put your bike on its centre stand and lift the front end of the bike to place a good solid 7” to 8” high by 10" wide block under it so that the front wheel is lifted up off the ground. With this arrangement, it is also possible to remove both wheels together if required.
see image 1
Remove the front wheel, speedo drive, brake calipers and mud guard – it is not necessary to disconnect the brake hose. Fit a 3 or 4mm spacer between the brake pads to prevent unnecessary hassle should the brake lever get inadvertently pulled and tie it up out of the way – somewhere near the oil cooler should be fine.
see images 2 & 3
Remove the handlebars if it looks like you might need to push the stanchions downwards from above (it might be helpful to mark their position to save time later) and loosen the 8mm Allen clamp screws on the top and bottom yokes on one side only – best to work on one fork at a time, otherwise refitting them into the yokes might be tricky. This done, slide the fork downwards and out of the yokes being careful not to disturb the tube on which the headlamp is mounted.
see images 4 & 5
With the fork free, the stock stanchion protector plate can now be removed by carefully tapping it upwards with a hammer and a small piece of hardwood by degrees around its circumference. It’s worth giving the fork stanchion and slider a good clean at this point before applying a rubber compatible grease to the area of stanchion over which the gaiter is to be placed. Simply slide the new gaiter over and down the stanchion, fitting the wider end over the part of the fork slider previously occupied by the protector plate, pushing the end as far down towards the mudguard mounts as it will go (you might need to secure the gaiter with a tie or a jubilee clip, but I think this is best done after both forks are back in position in the yokes).
see images 6 & 7
The fork can then be fitted back up into the yokes simply by reversing the removal process so that the top of the stanchion (not the top cap) is level with the top face of the upper yoke. Tighten the lower clamp bolt first, then the upper one. see image 8
Repeat the above with the other fork.
You can now refit the front wheel (it might be worth pumping the forks a few times to let them settle before tightening the spindle bolt), speedo drive, mudguard, brake caliper and handlebars.
Screw and bolt torque data (Bonnie/T100):
Yoke clamp Allen bolts at 27Nm
Handlebar clamp bolts at 26Nm
Front mudguard to fork slider bolts at 12Nm
Front mudguard stays to fork slider bolts (10mm) at 9Nm
Front wheel spindle nut at 60Nm
Front wheel spindle clamp Allen bolt (at base of RH fork slider) at 27Nm
Front brake caliper mounting Allen bolts (on LH fork slider) at 28Nm
Attachments
-
 Fork Boot Changing by Keef 01.jpg45.3 KB · Views: 0
 -
 Fork Boot Changing by Keef 03.jpg33.3 KB · Views: 0
 -
 Fork Boot Changing by Keef 04.jpg29.8 KB · Views: 0
 -
 Fork Boot Changing by Keef 05.jpg43.9 KB · Views: 0
 -
 Fork Boot Changing by Keef 06.jpg31.7 KB · Views: 0
 -
 Fork Boot Changing by Keef 07.jpg31.2 KB · Views: 0
 -
 Fork Boot Changing by Keef 08.jpg31.1 KB · Views: 0
 -
 Fork Boot Changing by Keef 09.jpg39.8 KB · Views: 0
")