Bonafide
NBR founder
Original author is D9
WARNING - do not read or view this post further if you are offended or upset by the sight of scooters, messy *****-filled garages, the mundane trappings of suburbia, or eccentric Bonneville owners with sharp tools.
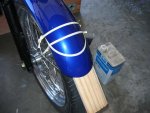
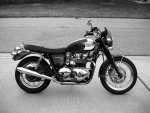
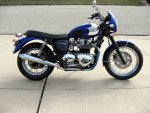
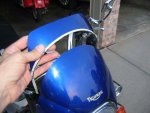
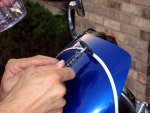
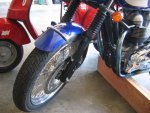
Below are some pics taken while bobbing fenders & Flyscreen. No pics of rear fender, but it was done the same way as the front.
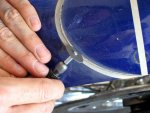
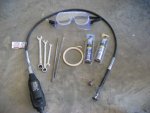
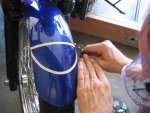
Tools are what you see - nothing special. The narrow-handled extension on the Dremel really allowed delicacy during the cutting maneuvers - highly recommend it. BTW, don't even THINK about getting anywhere near a Dremel without total eye protection - full goggles.
The cutting wheels used are the fiberglass reinforced type, approx 1". The wheel used to bob the Flyscreen was slightly larger, about 1 1/4" diameter.
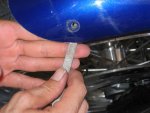
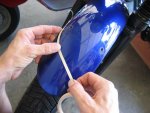
Also recommend high quality 1/4" masking tape from any automotive paint supplier - it really helps to have a re-positional tape that allows smooth curve contouring, makes it easier to get the shapes smooth.
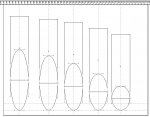
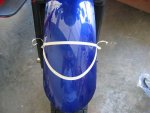
No marking or drawing was required; instead all "lines" were formed and refined with the tape - which also served as an essential high contrast visual guide while cutting. For the symmetry-challenged, one could easily make a simple paper template and use that as a tape guide. I did use a piece of tape or two, applied horizontally, to check for symmetry. Once the tape was giving me exactly the curve I wanted, it was pressed firmly in place.
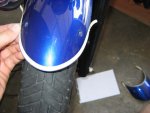
The cutting "line" is on one edge of the tape, depending on where you want your curve to begin and end.
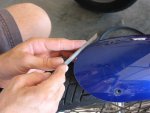
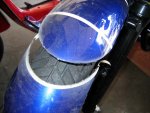
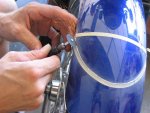
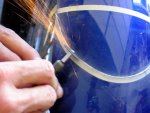
After positioning and repositioning, eyeballing, checking, and finally burnishing down the tape, safety goggles on, cutting wheel mounted securely, I started in with the dremel at highest rpm setting, moving very slowly, back and forth about an inch at a time, until a reasonably consistent groove was slotted all the way across the fender, then kept making smooth, light, back and forth passes until the wheel started to cut through. Care is required as the wheel begins to cut all the way through, as it tends to grab edges and jump. As seen in the photos, two hands are used at all times to cut and brace the tool.
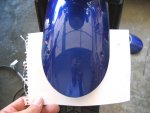
After cut-through was complete, I used fine metal files to smooth the path, remove any ragged metal, and contour edges and just worked until I was satisfied with it and the edge felt reasonably close to the painted factory edge. With medium or dark colored fenders, it helps to
put a white piece of paper behind the fender to help fine-tune the curve, as the paper will help you to see any roughness or unevenness.
I purchased a small bottle of touch-up color at a local auto parts store - not a perfect match, but I'm only intending to brush about a scant 1/32" on the edge of the fender. I used PPG DX330 as surface prep/area degreaser prior to painting.
Taped the mask line for the touch up, shook the bottle, and brushed away, let dry for an hour, brushed on another coat, done.
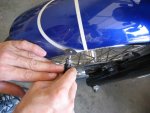
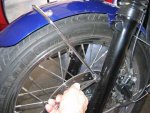
To bob the inboard edge (engine side) of the front fender, I first removed the four bolts securing the fender to the fork, removed the fender, turned it around, bolted two of the four fork bolts back in place, pushed a piece of wood between the tire and the underside of the fender to help reduce excess movement and vibration, then proceeded again to cutting with the Dremel. Certainly could have done something different to hold the fender, but this worked well, and it was all right there, so that's what I did. I did let most of the air out of the front tire to allow easier removal and replacement of the bolts that secure the fender to the fork.
I seriously considered removing the chrome fender stays, but decided to leave them on for now - plenty of material left if I decide to take off more later.
Flyscreen was handled the same way - on the bike, with care. After cutting, rather than filing, I sanded down and smoothed the edge with wet 220 grit automotive sandpaper on a rubber block - once again, just slowly working it to a smooth, even edge that feels good to the fingers. Probably should gently wet sand again with some 400 grit prior to painting, although the edge pretty much disappears as the Flyscreen is made of black plastic.
Overall, the changes are subtle but pleasing to me. The bobbed Flyscreen IMHO is an especially nice mod - I don't have a good pic of it yet. Overall I'd say the bike looks slightly leaner and cleaner, somehow lighter on it's feet - or rather, tires.
I'd highly recommend practicing a bit on a piece of 1/16" steel, whether or not you've worked with a Dremel previously, to get a feel for material resistance and feed rate while using the cutting wheel. And again - wear full coverage eye protection - the Dremel really throws off a lot of debris at an impressive velocity.
WARNING - do not read or view this post further if you are offended or upset by the sight of scooters, messy *****-filled garages, the mundane trappings of suburbia, or eccentric Bonneville owners with sharp tools.
Below are some pics taken while bobbing fenders & Flyscreen. No pics of rear fender, but it was done the same way as the front.
Tools are what you see - nothing special. The narrow-handled extension on the Dremel really allowed delicacy during the cutting maneuvers - highly recommend it. BTW, don't even THINK about getting anywhere near a Dremel without total eye protection - full goggles.
The cutting wheels used are the fiberglass reinforced type, approx 1". The wheel used to bob the Flyscreen was slightly larger, about 1 1/4" diameter.
Also recommend high quality 1/4" masking tape from any automotive paint supplier - it really helps to have a re-positional tape that allows smooth curve contouring, makes it easier to get the shapes smooth.
No marking or drawing was required; instead all "lines" were formed and refined with the tape - which also served as an essential high contrast visual guide while cutting. For the symmetry-challenged, one could easily make a simple paper template and use that as a tape guide. I did use a piece of tape or two, applied horizontally, to check for symmetry. Once the tape was giving me exactly the curve I wanted, it was pressed firmly in place.
The cutting "line" is on one edge of the tape, depending on where you want your curve to begin and end.
After positioning and repositioning, eyeballing, checking, and finally burnishing down the tape, safety goggles on, cutting wheel mounted securely, I started in with the dremel at highest rpm setting, moving very slowly, back and forth about an inch at a time, until a reasonably consistent groove was slotted all the way across the fender, then kept making smooth, light, back and forth passes until the wheel started to cut through. Care is required as the wheel begins to cut all the way through, as it tends to grab edges and jump. As seen in the photos, two hands are used at all times to cut and brace the tool.
After cut-through was complete, I used fine metal files to smooth the path, remove any ragged metal, and contour edges and just worked until I was satisfied with it and the edge felt reasonably close to the painted factory edge. With medium or dark colored fenders, it helps to
put a white piece of paper behind the fender to help fine-tune the curve, as the paper will help you to see any roughness or unevenness.
I purchased a small bottle of touch-up color at a local auto parts store - not a perfect match, but I'm only intending to brush about a scant 1/32" on the edge of the fender. I used PPG DX330 as surface prep/area degreaser prior to painting.
Taped the mask line for the touch up, shook the bottle, and brushed away, let dry for an hour, brushed on another coat, done.
To bob the inboard edge (engine side) of the front fender, I first removed the four bolts securing the fender to the fork, removed the fender, turned it around, bolted two of the four fork bolts back in place, pushed a piece of wood between the tire and the underside of the fender to help reduce excess movement and vibration, then proceeded again to cutting with the Dremel. Certainly could have done something different to hold the fender, but this worked well, and it was all right there, so that's what I did. I did let most of the air out of the front tire to allow easier removal and replacement of the bolts that secure the fender to the fork.
I seriously considered removing the chrome fender stays, but decided to leave them on for now - plenty of material left if I decide to take off more later.
Flyscreen was handled the same way - on the bike, with care. After cutting, rather than filing, I sanded down and smoothed the edge with wet 220 grit automotive sandpaper on a rubber block - once again, just slowly working it to a smooth, even edge that feels good to the fingers. Probably should gently wet sand again with some 400 grit prior to painting, although the edge pretty much disappears as the Flyscreen is made of black plastic.
Overall, the changes are subtle but pleasing to me. The bobbed Flyscreen IMHO is an especially nice mod - I don't have a good pic of it yet. Overall I'd say the bike looks slightly leaner and cleaner, somehow lighter on it's feet - or rather, tires.
I'd highly recommend practicing a bit on a piece of 1/16" steel, whether or not you've worked with a Dremel previously, to get a feel for material resistance and feed rate while using the cutting wheel. And again - wear full coverage eye protection - the Dremel really throws off a lot of debris at an impressive velocity.
Attachments
-
 Bobbing Fenders the D9 Way 01.jpg53.8 KB · Views: 0
 -
 Bobbing Fenders the D9 Way 08.jpg55.6 KB · Views: 0
 -
 Bobbing Fenders the D9 Way 07.jpg64.3 KB · Views: 0
 -
 Bobbing Fenders the D9 Way 06.jpg62.1 KB · Views: 0
 -
 Bobbing Fenders the D9 Way 05.jpg50.5 KB · Views: 0
 -
 Bobbing Fenders the D9 Way 04.jpg57.7 KB · Views: 0
 -
 Bobbing Fenders the D9 Way 03.jpg55.4 KB · Views: 0
 -
 Bobbing Fenders the D9 Way 02.jpg77.7 KB · Views: 1
Last edited by a moderator: