Airbox Removal

Bonafide

NBR founder
Originally Authored by Keef

I did my own airbox removal and found it fairly simple. Also, you'd have to look at the side panels very closely indeed to tell it had been done.

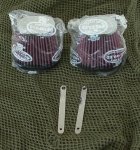
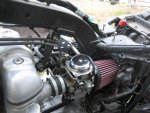
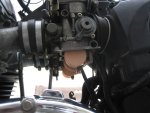
see image 1 - carb mounts made from old s/s cafetiere - holes drilled to 8mm (top) & 9mm (bottom - later enlarged to fit round the upper carb connecting rod), 105mm centre to centre, and K&N filters (part nos: RC2890 & RC 2900)

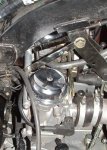
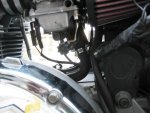
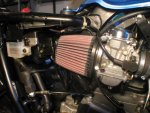
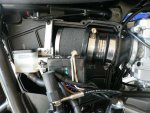
see image 2 - carb mounts fitted

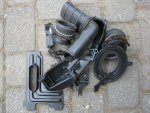
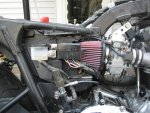
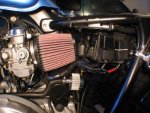
see image 3 - cutting down stock airbox

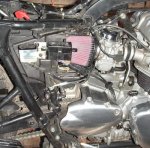
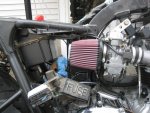
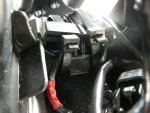
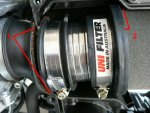
see image 4 - LH K&N filter fitted (note: lower mount for stock filter has been removed to allow more storage space for tools, etc.)

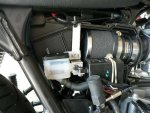
see image 5 - RH K&N filter, airbox cover, rear brake reservoir and fuse box fitted (the plastic screw holding the fuse box to the reservoir mount has been replaced with a s/s Allan bolt)

I had to remove the upper connecting rod and shorten the thicker/outer part of it at both ends with a file (by the thickness of the two pieces of S/S) it so that it would fit through the holes in the S/S(which I drilled out to the same diameter as the locating holes in the carbs) and back into the holes in the carbs.

I fitted the Wiseco 904 BB kit (AI removed and 18 tooth sprocket added) and ended up rejetting to 130 "Dyno" mains (not sure what the standard-type equivalent would be - perhaps 152 to 155 ish?) with 42 pilots. I also fitted Thruxton needles with six (yes six) shims to account for the extra response due to replacing the stock slide springs with a pair from a Kawasaki GPz900. The cans I'm using are a pair of togas with JC Whitney type baffles (only a bit shorter) which were "opened up" by having a 10mm drift battered down through the middle.
 

Attachments

  • Airbox Removal 01.jpg
    Airbox Removal 01.jpg
    60.8 KB · Views: 0
  • Airbox Removal 02.jpg
    Airbox Removal 02.jpg
    44.2 KB · Views: 0
  • Airbox Removal 03.jpg
    Airbox Removal 03.jpg
    51.1 KB · Views: 0
  • Airbox Removal 04.jpg
    Airbox Removal 04.jpg
    57.4 KB · Views: 0
  • Airbox Removal 05.jpg
    Airbox Removal 05.jpg
    64.6 KB · Views: 0

Bonafide

NBR founder
Original author is markbvt

I had read through Keef's airbox mod post and decided to gut my airbox as well and save the cost of a removal kit.

I figured I'd start with the carb rejet, since I didn't want to risk making the bike un-rideable by cutting into the airbox and then not being able to get the carb bowls off due to stripped screw heads or something. But to my surprise, the butter-soft screws came out without issue.

Carbs with bowls removed, prior to rejet: see image 1

Turned out that while the infamous carb screws came out easily, the pilot jets did not. I had to make two trips to the hardware store to find a screwdriver that was just the right size to get those bastards loose.

But eventually I got them out and proceeded with the airbox mods. I started by removing the left side panel. (I stuffed a clean shop rag in the carb mouth to prevent debris from getting in.) see image 2

Next I removed the right side panel and restrictor plate. I used a Dremel with a reinforced cutting wheel to cut away the parts of the airbox that were in the way. The K&N pod filter slipped onto the carb easily. see image 3

Next I cut down the side panel to clear the filter, while leaving mounting points for the brake master cylinder and electrics intact. This also preserves the slot for the Allen wrench that comes with the bike. see image 4

I cut an inch and a half or so off the end of the crankcase breather hose and attached the breather filter. I was able to push it up between the carbs in an upright position. see image 5

Left side filter installation worked the same as on the right side. Again, mounting points for electrics remain intact, for the most part. I'm going to put together a toolkit to stow in the old filter location (thanks for the idea, Keef!). With airbox side panels reinstalled, here's what everything looks like. see image 6

And here's the pile of discarded airbox pieces. see image 7

Went for a test ride after I finished -- wow! The intake roar at WOT is pretty astonishing. Throttle response was good through the entire rev range, and the bike pulls hard throughout. Only issue I noticed was a slight bog right off idle when the engines hot -- I'll turn the mixture screws in half a turn and see if it goes away. Jetting is 135 mains, 42 pilots, Thruxton needles with one shim, 3 turns out (currently; will decrease), pipes are old TORs that have gotten packed out and flow better than new ones.

I should also fabricate a sturdier carb brace -- or at least, a second one. The left carb is vibrating quite a bit.

--mark

Glad my post helps!


A few tips on performing the airbox surgery:
* Give yourself plenty of time. Some parts of the procedure may take much longer than it seems like they should. The pilot jets, for example, took me a couple hours to remove, including two trips to the hardware store. Save yourself some time by making sure you have the right size screwdriver before you begin. Take your replacement pilot jet to the hardware store and find a screwdriver that fits it perfectly and that preferably doesn't get any wider (if it does, you'll need to file it down) and is no more than 4" or so long. Also, an inspection mirror on a stick (like dentists use) is extremely helpful. Work slowly, deliberately, and carefully in order to avoid making a mistake that will cause you a much bigger pain in the ass.

* Start with the carbs. This way if you can't get the screws or pilot jets out, the bike is still rideable. When you're tightening the stainless steel replacement screws, be careful -- the carb body is made of soft metal, and it's easy to strip the threads. Yes, I discovered this the hard way. I'm hoping I'm not ever going to need to remove the left-side carb bowl again.

* If you're replacing your needles with Thruxton ones or shimming the stock ones, remove the caps and springs from the tops of the carbs and be careful not to disturb the rubber diaphragms. Use needle nose pliers or a hemostat to pull the little plastic widget and the needle out of the slide without raising it. I've heard the diaphragms are a real pain to get seated properly if they've been removed. I had already dealt with enough other annoyances, so I did not want to find out for myself.

* There's no need to remove the airbox from the bike, or even to put the bike up on a lift. Side panels can be removed with the airbox in place. There are three screws on each side that are hard to get to because they're obscured by the frame. Grab onto the heads with vice grips or needle nose pliers and turn them a little bit at a time -- eventually you'll get them out. (FWIW -- I've removed the rear fender from my bike. If you haven't, you may need to remove it to get to all the screws -- or you may not. I don't know.)

* Be careful not to get any plastic chips/dust into the carb mouths.

* Cut away airbox side panel pieces a little bit at a time to get the covers to clear the filters while leaving as many of the stock electric/etc mounting locations intact as possible.

* Side covers fit back on the bike without modification, and the appearance of the bike once fully reassembled is like stock, unless you walk up close and look for the pod filters.

One word of caution -- if you don't want a hellacious intake bellow at WOT, don't do this mod. I was surprised at how loud it was. However, at partial throttle it remains fairly polite.
 

Attachments

  • Airbox Removal the markbvt Way 07.jpg
    Airbox Removal the markbvt Way 07.jpg
    94.6 KB · Views: 0
  • Airbox Removal the markbvt Way 06.jpg
    Airbox Removal the markbvt Way 06.jpg
    81.8 KB · Views: 0
  • Airbox Removal the markbvt Way 05.jpg
    Airbox Removal the markbvt Way 05.jpg
    68.7 KB · Views: 0
  • Airbox Removal the markbvt Way 04.jpg
    Airbox Removal the markbvt Way 04.jpg
    88.2 KB · Views: 0
  • Airbox Removal the markbvt Way 03.jpg
    Airbox Removal the markbvt Way 03.jpg
    96.7 KB · Views: 0
  • Airbox Removal the markbvt Way 02.jpg
    Airbox Removal the markbvt Way 02.jpg
    77.6 KB · Views: 0
  • Airbox Removal the markbvt Way 01.jpg
    Airbox Removal the markbvt Way 01.jpg
    63.9 KB · Views: 0

Bonafide

NBR founder
Original author is Psasak

Bonneville goes up on the lift, and I started dismantling the bike. Rear fender off, upper shocks disconnected, battery out, and everything connected to the airbox discombobulated. Using pictures of existing NARKs, I more-or-less cut around what I wanted to be left with at the end. I cut the right side down to save the screw hole for the rear brake reservoir. I cut the left side apart to save the slots for the relays and re-attached them. The starter relay I re-attached to the front of the battery box with two small screws (shortened so as not to gouge the battery).

I made a small bracket to fit to the front of the battery box to hold the fuse box - it fits right next to the starter relay.

As someone else did on this board, I made two brackets to support the carbs - using the cylinder head bolt under the gas tank. The brackets I made are 4.5 inches long and the holes are exactly 4 inches apart center-to-center.

After getting it all put back together, I had about three hours invested in this, and a handful of airbox screws left over.

The crankcase breather is from Bella Corse. I'm not sure if I want to leave it right there, but until an idea pops up, there it lies.

see image 1

see image 2
 

Attachments

  • Airbox Removal - Psasack 01.jpg
    Airbox Removal - Psasack 01.jpg
    78.7 KB · Views: 0
  • Airbox Removal - Psasack 02.jpg
    Airbox Removal - Psasack 02.jpg
    82 KB · Views: 0

Bonafide

NBR founder
Original author is BlackJack

OK - This is early days of development and I am sure it can be refined along the way......

Firstly go through the usual steps of removing the airbox side covers - There are good links on the this site to doing this part - Basically undo all you can and the screws hidden behind the frame use a pair of long nose vise grips - it is not that hard I done it without undoing shocks etc.

I started with some Stainless 55mm Outside Diameter Flexi pipe. The initial plan was to run straight from the Carb in to the airbox, hence the flexi pipe. What I didn't realize was when I went to the local exhaust shop it just happened the bit he picked up out of his off cuts bin had been flared out and had an inside diameter of 55mm - which would of been ideal and I didn't realize this to much later in the piece and of course when I tried to fit it up I used the smaller end and it wouldn't fit.

I used stainless rather than plastic as I didn't want it wobbling around (for several reasons including, loosening, air flow, wear etc) but in hindsight using a much shorter length then first planned, plastic may be easier on the rubber boot.

As this is probably the weak link. I have inserted the pipe right in until it goes through the airbox semi circle cut out and this gives it support so I reckon it will be ok (see diagram 1 - point 1) - Just don't push it too far as it will rub on the bends on the carb side of the rubber. You can see and feel as you go how far you have inserted it.

see image 1

As the boot is still in tact it means you don't need additional support for the Carb.

The size of the Flexi Tube is 55mm OD, length is 62mm. You need to insert the tube in to the boot while it is on the carb and mounted to the airbox - You don't need the air cleaner on at this stage. (UniPods are 65mm long)

Next, as the flexi pipe is a very tight fit and the hose clamp restricts getting the flexi pipe in. So I separated a hose clamp and ran it around the boot and rejoined and tightened.

I then put the air cleaner hose clamp over the flexi tube and put the air cleaner on. Then slip the hose clamp on and tighten. Nb: the widest part of the base of the filter should be just inside the step-up on the air box (See Diagram 1 Point 2)

From the left side once fitted it should look something like this

see image 2

I then repeated on the right side.....

see image 3

Next I relocated the flasher units to the base of the airbox There are two tabs on the bottom of the box that I ran a very large cable tie through around each flasher ans secured this keeps the flashers well of the base of the airbox. (In case water gets in)

see image 4

I then bent up a piece of bracket to attach the other electrical thingamajiggy? I used one of the original screw holes and screws in the top of the airbox to secure the bracket - I bent it in under the bottom of the battery box (again less chance of getting wet) and under the thingamajiggy, so it cant slip down, again a cable tie through the tabs on the thingamajiggy secure this to the bracket.
Photo showing bends and mounting point

see image 5

Back to the right side - Pretty simple - A straight piece of bracket, again mounted to existing airbox point. I used the existing brake res bracket just turned it the other way and drilled an extra hole in it. I then used a small bit of angle to clear the screw and mount the fuse box. The other bit that runs off the fuse box fits securely in the corner grooves of where the restrictor plate slid in.

see image 6

I know I should of taken heaps more photos as I was going, but as I was making it up as I went along - I didn't know where I would end up!

Now I have no idea on performance as I have no benchmark to test against - but surely it has to work? There are no air leaks to report. Now if someone with a NARK where to throw the boots back on to the carb and stick a bit of flexi pipe in them and mount the pods and just see if there is any difference in performance or Dyno - that would be good.......

Anyhow If it doesn't work could always go back to stock with restrictor high flow filter and snorkel removed as you haven't butchered anything to try this mod. It may also help if your selling your bike down the track, not everyone may like the pod system?
 

Attachments

  • Airbox Removal the Blackjack Way 05.jpg
    Airbox Removal the Blackjack Way 05.jpg
    22.5 KB · Views: 0
  • Airbox Removal the Blackjack Way 04.jpg
    Airbox Removal the Blackjack Way 04.jpg
    81.8 KB · Views: 0
  • Airbox Removal the Blackjack Way 03.jpg
    Airbox Removal the Blackjack Way 03.jpg
    72.6 KB · Views: 0
  • Airbox Removal the Blackjack Way 02.jpg
    Airbox Removal the Blackjack Way 02.jpg
    72 KB · Views: 0
  • Airbox Removal the Blackjack Way 01.jpg
    Airbox Removal the Blackjack Way 01.jpg
    70 KB · Views: 0
  • Airbox Removal the Blackjack Way 06.jpg
    Airbox Removal the Blackjack Way 06.jpg
    72.7 KB · Views: 0
Top